# only compare part of results
assert np.allclose(
pytorch_result, onnx_result,
atol=1.e-5), 'The outputs are different between Pytorch and ONNX'
print('The numerical values are same between Pytorch and ONNX')
Thursday, 15 July 2021
How to compare numpy array between two variables?

Saturday, 10 July 2021
Sunday, 4 July 2021
How to install remote desktop in ubuntu18?
reference: https://c-nergy.be/blog/?p=13390
Issues with xRDP and Ubuntu 18.04.2 – How to fix it
Hello World,
Based on the feedback we have received through this blog, it seems that there is some changes that has been introduced in Ubuntu 18.04.2 which seems to break the xRDP capability and people cannot perform the remote desktop connection anymore. After being presented with the xRDP login page, only the green background screen is presented to you and will fail eventually. This issue will occur if you perform a manual installation or if you use the latest version of Std-Xrdp-Install-5.1.sh script.
This post will explain what’s needs to be done in order to fix this issue. So, let’s go !
Overview
Ubuntu 18.04.2 has been released and more and more people are noticing that after installing the xRDP package, they are not able to connect to the desktop interface through remote desktop connection software. Apparently, Ubuntu 18.04.2 has introduced some changes that preventing xRDP package to work as expected. We have performed a manual installation to see what could be the problem.
Problem Description
So, to perform a manual installation, we have opened a terminal console and we have issued the following command
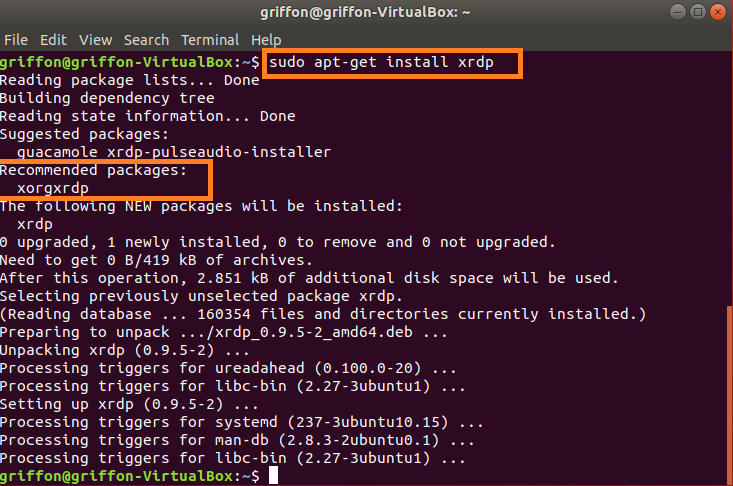
sudo apt-get install xrdp

Click on Picture for Better Resolution
After having performed the installation, we have checked that the xrdp service was running using the following commane
sudo systemctl status xrdp
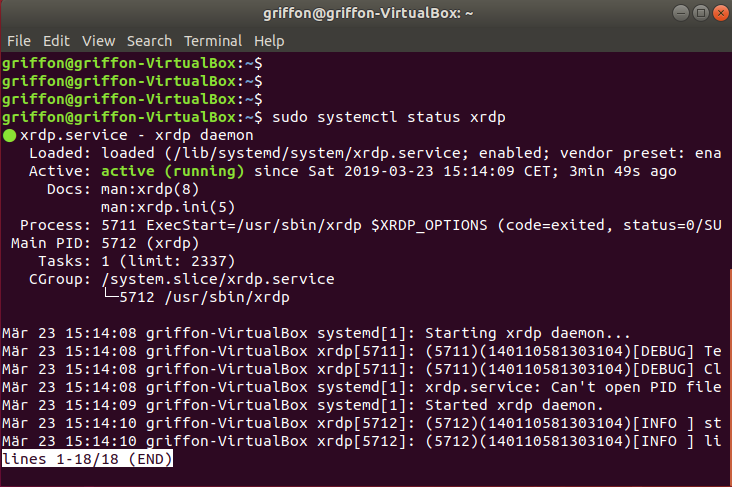
Click on Picture for Better Resolution
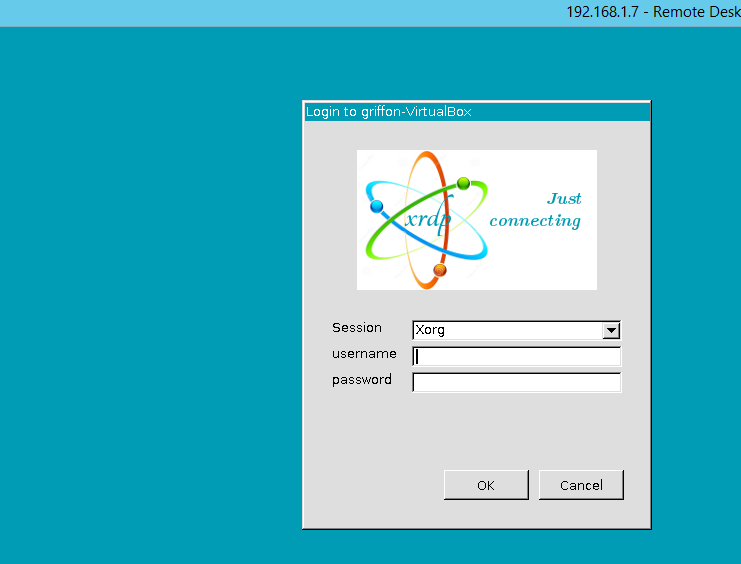
So far, everything seems to be working as expected. So, we moved to a windows computer, fired up the remote desktop client and as we can see in the screenshot, we are presented with the xrdp login page
Click on Picture for Better Resolution
After entering our credentials, we only see a green background page and nothing happens. After a certain amount of time (several minutes), you should see the following error message
connection problem,giving up
some problem
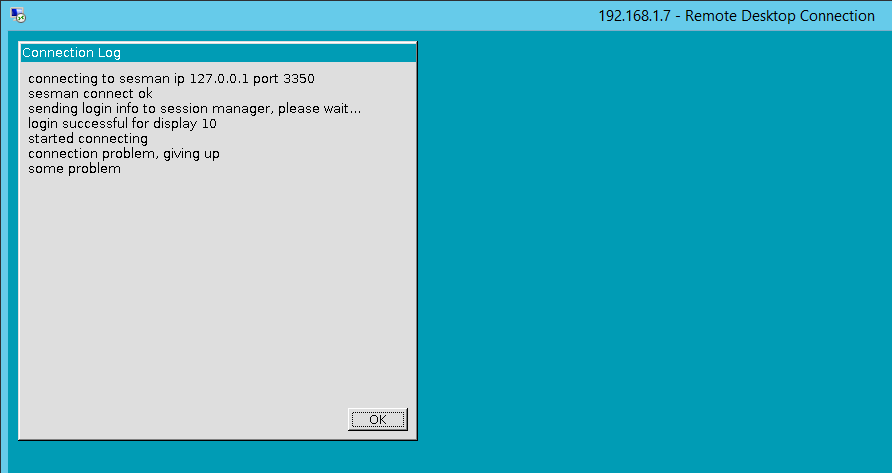
Click on Picture for Better Resolution
Resolution process
After looking into the logs, it seems that the xorgxrdp component of xRDP is not working as expected. When we have performed the installation of the xRDP package, we have noticed that information displayed in the console mentionning that xorgxrdp package is needed (see screenshot below). So, when performing the xrdp installation, it seems that the xorgxrdp package is not installed anymore.
Click on Picture for Better Resolution
So, it’s seems that the issue encountered is due to the fact that the xorgxrdp package is not installed. So, moving forward, we have decided to install the xorgxrdp package manually just after installing the xrdp package. So, we have issued the following command in a Terminal console
sudo apt-get install xorgxrdp
Issuing this command will not perform the installation as there are some dependencies errors.

Click on Picture for Better Resolution
We have just found the root cause issue.
The xorgxrdp package cannot be installed because of some missing dependencies. Because we have no xorgxrdp component installed on the computer, it seems logical that when we perform a remote connection, we are never presented with the Ubuntu desktop…
Fixing xRDP on Ubuntu 18.04.2
If you are performing a brand new xRDP installation or if you have installed xRDP and you are encountering the issue, you will need to perform the following actions
| New xRDP installation | xRDP already installed |
|---|---|
|
|
New xRDP installation Scenario
So, let’s go into more details. Let’s assume, you have performed a fresh installation of Ubuntu 18.04.2 and you want to install xRDP package through a manual installation, you will need to perform the following actions.
Step 1 – Install xserver-xorg-core by issuing the following command
sudo apt-get install xserver-xorg-core
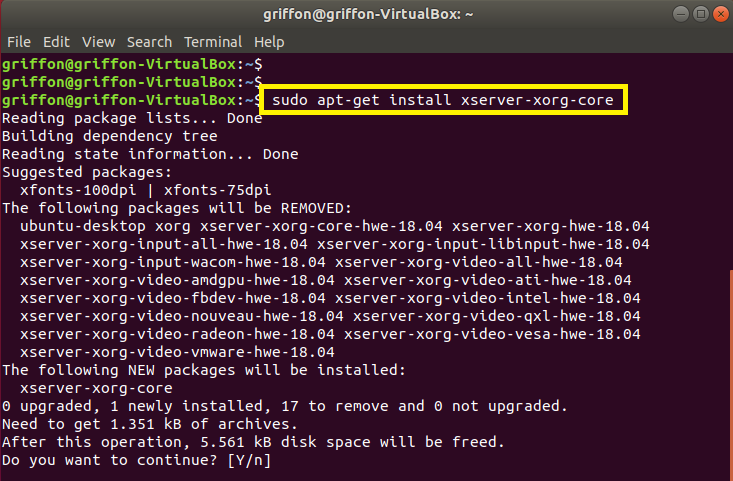
Click on Picture for Better Resolution
Note : You will notice that installing this package will trigger removal of packages *xserver-xorg-hwe-18.04* which might be used or needed by your system… So, you might loose keyboard and mouse input when connecting locally to the machine. To fix this issue, you will have to issue the following command just after this one
sudo apt-get -y install xserver-xorg-input-all
Step 2 – Install xRDP package
sudo apt-get install xrdp
In the screenshot, you can see that because there is no more dependencies issues, the xorgxrdp package is listed to be installed along with the xRDP package
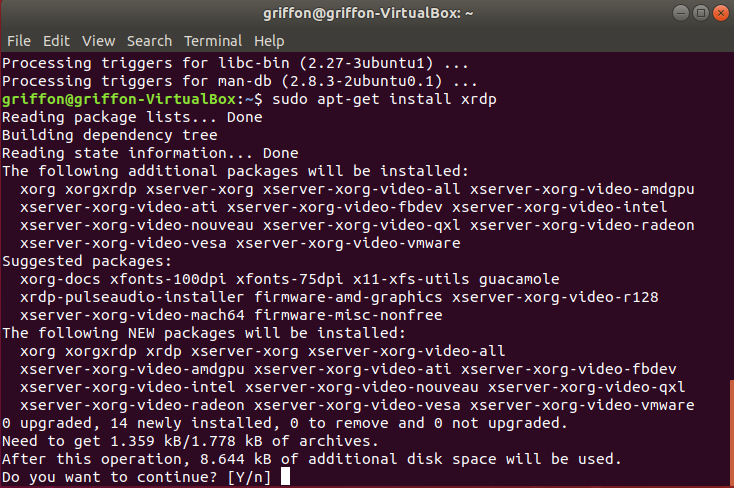
Click on Picture for Better Resolution
Fixing xRDP installed package
If you have performed the installation of xRDP packages on Ubuntu 18.04.2 using the Std-Xrdp-install-0.5.1.sh script, in order to restore the xrdp functionality, you will need to simply install the missing dependencies by issuing the following command
sudo apt-get install xserver-xorg-core
Click on Picture for Better Resolution
Note : Again, you will notice that installing this package will trigger removal of 17 packages *xserver-xorg*-hwe-18.04* which might be used or needed by your system…So, you might loose keyboard and mouse input when connecting locally to the machine. To fix this issue, you will have to issue the following command just after this one
sudo apt-get -y install xserver-xorg-input-all
After installing the missing dependencies, you will need to manually install the xorgxrdp package in order to restore the xRDP functionality
sudo apt-get install xorgxrdp
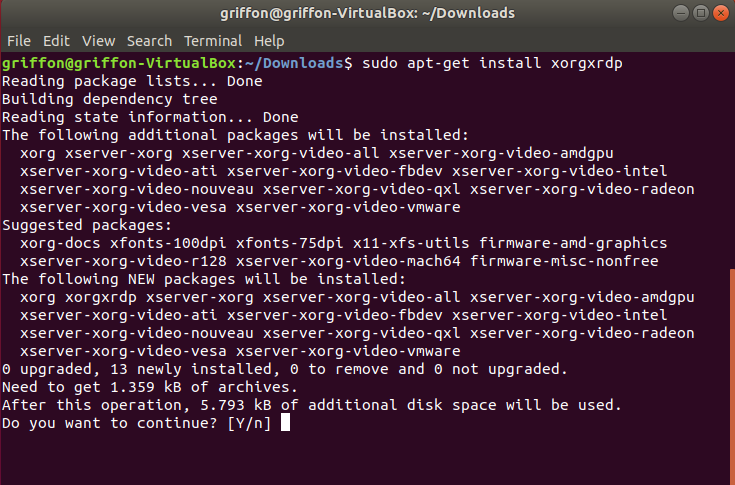
Click on Picture for Better Resolution
When this is done, you will be able to perform your remote connection against your Ubuntu 18.04.2

Click on Picture for Better Resolution
Fixing keyboard and mouse issues in Ubuntu 18.04.2
After installing xRDP package using the recipe above or if you have used the custom installation script (version 2.2), you might encounter another issue. When login in locally on the ubuntu machine, you will notice that you have lost keyboard and mouse interaction. Again, as explained above, the fix is quite simple, rune the following command in the terminal session
sudo apt-get -y install xserver-xorg-input-all
Note : As long as you do not reboot after installing the xRDP package, you will not have any problems. After a reboot, you might loose keyboard and mouse input on your system.
Final Notes
The addition of the xserver-xorg-hwe-18.04 and associated packages seems to have introduced some dependencies changes that interfere wit the xorgxrdp and xrdp packages version available on Ubuntu repository. So, if you have used the Std-Xrdp-Install-0.5.1.sh script and you are facing this issue, you will need to manually install the xorgxrdp package. If you have used the custom installation script (install-xrdp-2.2.sh), you will not have the issue as the script compile and install the xorgxrdp package separately and we are using the latest xrdp and xorgxrdp package version..However, you might also have the keyboard and mouse problem. Again, you will need to re-install the xserver-xorg-input-all package...
It seems that we will need to update the script in order to provide support for Ubuntu 18.04.2 as Ubuntu 18.04 is a Long Term support release. Please be patient as it might take us some time before we can upload the new version of the script….
Hope this clarify the issue…
Till next time
See ya
Monday, 28 June 2021
How to setup Nvidia ngc in ubuntu18?
wget -O ngccli_cat_linux.zip https://ngc.nvidia.com/downloads/ngccli_cat_linux.zip && unzip -o ngccli_cat_linux.zip && chmod u+x ngc
echo "export PATH=\"\$PATH:$(pwd)\"" >> ~/.bash_profile && source ~/.bash_profile
ngc config set
Sunday, 27 June 2021
How to run docker in docker ubuntu?
docker run --gpus all -it -v /var/run/docker.sock:/var/run/docker.sock -p 8888:8888 nvidia/cuda:11.0-base nvidia-smi
Saturday, 5 June 2021
How to do vector multiplication using a batch size of 4 in C++?
https://blog.csdn.net/fuwenyan/article/details/77742766
本博记录为卤煮理解,如有疏漏,请指正。转载请注明出处。
卤煮:非文艺小燕儿
本博地址:利用SSE计算向量点乘simd_dot
所谓SSE(Streaming SIMD Extensions),也就是单指令多数据流的扩展。所谓单指令多数据流呢,简单理解就是多个数据流同时处理一条指令。
举个栗子:
一个水箱中的水,底部开1个洞放水,就是单指令单数据流。底部同时开多个相同大小的洞放水,就是单指令多数据流。
多个洞放水当然会比1个洞放得快啦,也就是同样的指令,多数据流速度就快呀。
对于SSE,其实就是处理器中专门开辟了多个128位的寄存器。对于单精度浮点数,占用32bit,那么1个128bit的SSE寄存器,就可以存放4个单精度浮点数。对于单精度浮点数的运算指令,其实就相当于开了4个洞。比如,两个128位的SSE寄存器中存放的数据进行乘法运算,那么一次性就能得到4组运算结果。
大概就是这么个意思。接下来就对采用SSE优化的向量点乘进行详细注释说明。
输入x和y都是长度为len的向量。我们要求x.*y,并将结果返回。
————————————————
版权声明:本文为CSDN博主「非文艺小燕儿_Vivien」的原创文章,遵循CC 4.0 BY-SA版权协议,转载请附上原文出处链接及本声明。
原文链接:https://blog.csdn.net/fuwenyan/article/details/77742766
============
float simd_dot(const float* x, const float* y, const long& len) {
float inner_prod = 0.0f;
__m128 X, Y; //声明两个存放在SSE的128位专用寄存器的变量
__m128 acc = _mm_setzero_ps(); // 声明一个存放在SSE的128位专用寄存器的变量,用来存放X+Y的结果,初始值为0
float temp[4];//存放中间变量的参数
long i;
for (i = 0; i + 4 < len; i += 4) {//128位专用寄存器,一次性可以处理4组32位变量的运算
X = _mm_loadu_ps(x + i); // 将x加载到X(由于128位可以存放四个32位数据,所以默认一次加载连续的4个参数)
Y = _mm_loadu_ps(y + i);//同上
acc = _mm_add_ps(acc, _mm_mul_ps(X, Y));//x*y,每轮的x1*y1求和,x2*y2求和,x3*y3求和,x4*y4求和,最终产生的四个和,放在acc的128位寄存器中。
}
_mm_storeu_ps(&temp[0], acc); // 将acc中的4个32位的数据加载进内存
inner_prod = temp[0] + temp[1] + temp[2] + temp[3];//点乘求和
// 刚才只是处理了前4的倍数个元素的点乘,如果len不是4的倍数,那么还有个小尾巴要处理一下
for (; i < len; ++i) {
inner_prod += x[i] * y[i];//继续累加小尾巴的乘积
}
return inner_prod;//大功告成
}
Thursday, 3 June 2021
How To Delete A APT Repository And GPG Key In Ubuntu?
Reference: https://ostechnix.com/how-to-delete-a-repository-and-gpg-key-in-ubuntu/
Delete a repository in Ubuntu
Whenever you add a repository using "add-apt-repository" command, it will be stored in /etc/apt/sources.list file.
To delete a software repository from Ubuntu and its derivatives, just open the /etc/apt/sources.list file and look for the repository entry and delete it.
$ sudo nano /etc/apt/sources.list
As you can see in the below screenshot, I have added Oracle Virtualbox repository in my Ubuntu system.
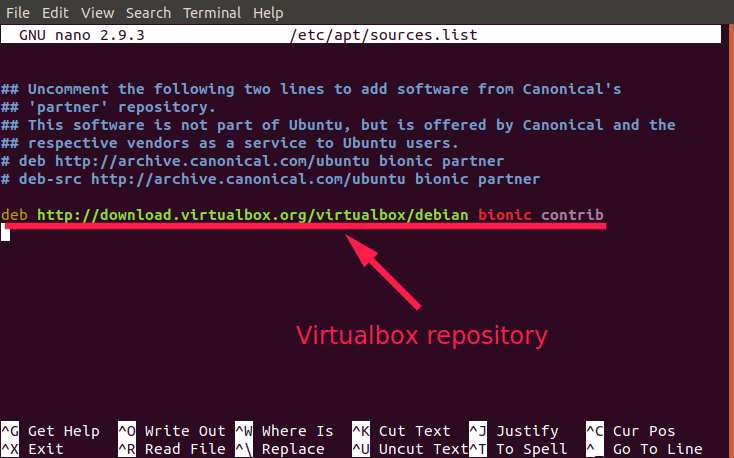
The contents of /etc/apt/sources.list file
To delete this repository, simply remove the entry. Save and close the file.
If you have added PPA repositories, look into /etc/apt/sources.list.d/ directory and delete the respective entry.
Alternatively, you can delete the repository using "add-apt-repository" command. For example, I am deleting the Systemback repository like below.
$ sudo add-apt-repository -r ppa:nemh/systemback
Finally, update the software sources list using command:
$ sudo apt update
===========================================================
Delete repository keys in Ubuntu
We use "apt-key" command to add the repository keys. First, let us list the added keys using command:
$ sudo apt-key listThis command will list all added repository keys.
/etc/apt/trusted.gpg -------------------- pub rsa1024 2010-10-31 [SC] 3820 03C2 C8B7 B4AB 813E 915B 14E4 9429 73C6 2A1B uid [ unknown] Launchpad PPA for Kendek pub rsa4096 2016-04-22 [SC] B9F8 D658 297A F3EF C18D 5CDF A2F6 83C5 2980 AECF uid [ unknown] Oracle Corporation (VirtualBox archive signing key) <info@virtualbox.org> sub rsa4096 2016-04-22 [E] /etc/apt/trusted.gpg.d/ubuntu-keyring-2012-archive.gpg ------------------------------------------------------ pub rsa4096 2012-05-11 [SC] 790B C727 7767 219C 42C8 6F93 3B4F E6AC C0B2 1F32 uid [ unknown] Ubuntu Archive Automatic Signing Key (2012) <ftpmaster@ubuntu.com> /etc/apt/trusted.gpg.d/ubuntu-keyring-2012-cdimage.gpg ------------------------------------------------------ pub rsa4096 2012-05-11 [SC] 8439 38DF 228D 22F7 B374 2BC0 D94A A3F0 EFE2 1092 uid [ unknown] Ubuntu CD Image Automatic Signing Key (2012) <cdimage@ubuntu.com> /etc/apt/trusted.gpg.d/ubuntu-keyring-2018-archive.gpg ------------------------------------------------------ pub rsa4096 2018-09-17 [SC] F6EC B376 2474 EDA9 D21B 7022 8719 20D1 991B C93C uid [ unknown] Ubuntu Archive Automatic Signing Key (2018) <ftpmaster@ubuntu.com>As you can see in the above output, the long (40 characters) hex value is the repository key. If you want APT package manager to stop trusting the key, simply delete it using command:
$ sudo apt-key del "3820 03C2 C8B7 B4AB 813E 915B 14E4 9429 73C6 2A1B"Or, specify the last 8 characters only:
$ sudo apt-key del 73C62A1BDone! The repository key has been deleted. Run the following command to update the repository lists:
$ sudo apt update
Subscribe to:
Posts (Atom)