Thursday, 9 December 2021

10 Practical Examples of Rsync Command in Linux

 https://www.tecmint.com/rsync-local-remote-file-synchronization-commands/


1. Copy/Sync Files and Directory Locally

Rsync Local Files


2. Copy/Sync a Directory on Local Computer

Rsync Local Directory


3. Copy/Sync Files and Directory to or From a Server

Rsync Directory Remote System 

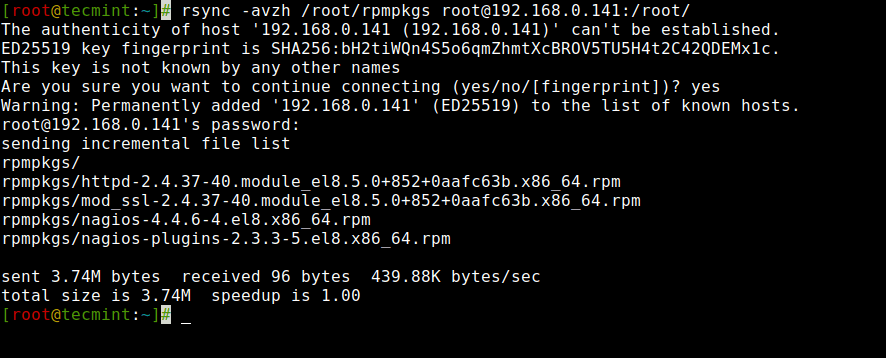
4. Rsync Over SSH

Rsync Copy Remote File to Local


Rsync Copy Local File to Remote


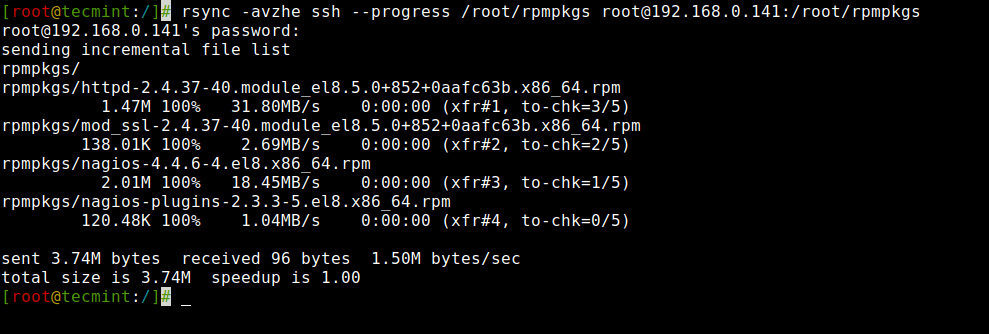
5. Show Progress While Transferring Data with rsync

Rsync Progress While Copying Files


6. Use of –include and –exclude Options

Rsync Include and Exclude Files 

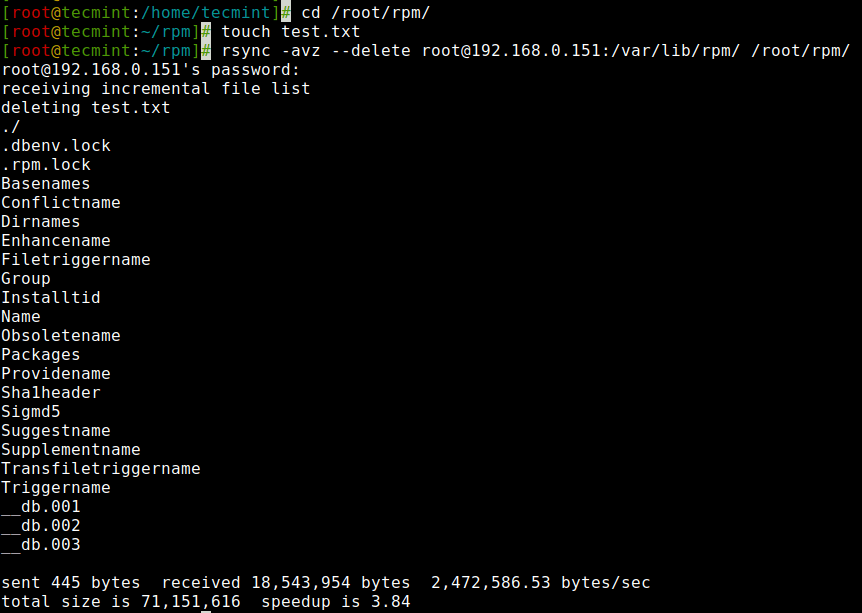
7. Use of –delete Option

If a file or directory does not exist at the source, but already exists at the destination, you might want to delete that existing file/directory at the target while syncing.
Rsync Delete Option 

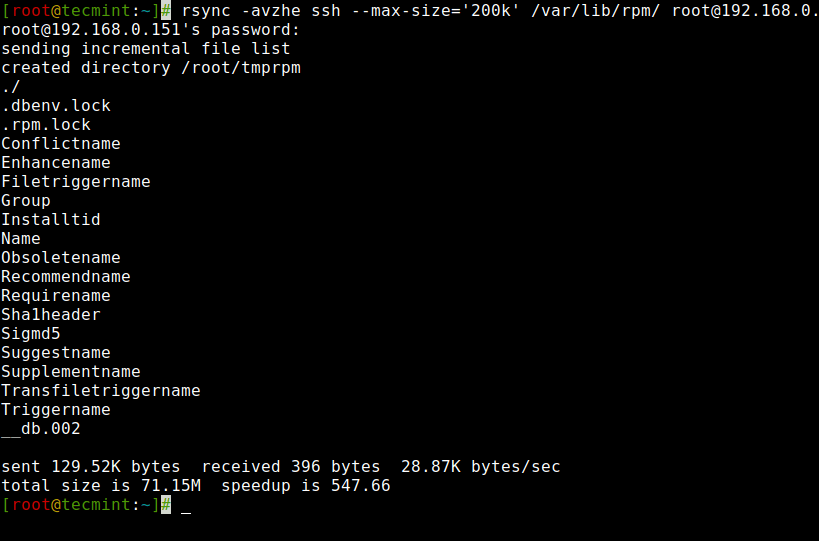
8. Set the Max Size of Files to be Transferred

this command will transfer only those files which are equal to or smaller than 200k.

Rsync Set Max File Transfer Size 

9. Automatically Delete source Files After Successful Transfer

Rsync Delete Source File After Transfer

Tuesday, 9 November 2021

Face Landmark Annotation Tool

 import cv2

pts = []
count = 0
def click_event(event,x,y,flags,params):
    if event == cv2.EVENT_LBUTTONDOWN:
        pts.append([x,y])
        font = cv2.FONT_HERSHEY_SIMPLEX
        cv2.circle(img, (x,y), 2, (0,255,0))
        cv2.putText(img,str(len(pts)-1),(x,y),font,0.5,(255,0,0),1)
        print(pts)

        cv2.imshow('image',img)
    if event == cv2.EVENT_RBUTTONDOWN:
        pts.pop()

if __name__ =="__main__":
    img = cv2.imread('/home/ccng/a2e/face-analysis-sdk/build/bin/afanqi.jpg',1)

    cv2.imshow('image',img)

    cv2.setMouseCallback('image',click_event)

    cv2.waitKey(0)

    cv2.destroyAllWindows()

Thursday, 28 October 2021

conda pip install TypeError: join() argument must be str or bytes, not ‘int‘

curl https://bootstrap.pypa.io/get-pip.py -o get-pip.py

conda activate python35

python get-pip.py

Thursday, 5 August 2021

How to generate a chrome playable video in python? videowriter, videoreader

 import cv2
import numpy as np
import subprocess as sp

# writer = cv2.VideoWriter(path, cv2.VideoWriter_fourcc(*"h264"), fps,
#                          (int(width), int(height)))
# for b in buffers:
#     writer.write(b)
# writer.release()

# Create a VideoCapture object
cap = cv2.VideoCapture('input.mp4')

# Check if camera opened successfully
if (cap.isOpened() == False):
  print("Unable to read camera feed")

# Default resolutions of the frame are obtained.The default resolutions are system dependent.
# We convert the resolutions from float to integer.
frame_width = int(cap.get(3))
frame_height = int(cap.get(4))

path = "output.mp4"
FFMPEG_BIN = "ffmpeg" # on Linux ans Mac OS
command = [ FFMPEG_BIN,
    '-y', # (optional) overwrite output file if it exists
    '-f', 'rawvideo',
    '-vcodec','rawvideo',
    '-s', '%dx%d' % (frame_width, frame_height), # size of one frame
    '-pix_fmt', 'bgr24',
    '-r', '15', # frames per second
    '-i', '-', # The input comes from a pipe
    '-an', # Tells FFMPEG not to expect any audio
    '-vcodec', 'h264',
    '%s' % (path) ]

pipe = sp.Popen( command, stdin=sp.PIPE, stderr=sp.PIPE)

while(True):
  ret, frame = cap.read()

  if ret == True:
    
    # Write the frame into the file 'output.avi'
    # out.write(frame)
    pipe.stdin.write( frame.tostring() )


    # Display the resulting frame    
    cv2.imshow('frame',frame)

    # Press Q on keyboard to stop recording
    if cv2.waitKey(1) & 0xFF == ord('q'):
      break

  # Break the loop
  else:
    break  

if pipe:
    pipe.stdin.close()
    if pipe.stderr is not None:
        pipe.stderr.close()
    pipe.wait()
    pipe = None
    
# When everything done, release the video capture and video write objects
cap.release()
# out.release()

# Closes all the frames
cv2.destroyAllWindows()

Thursday, 15 July 2021

How to compare numpy array between two variables?

         # only compare part of results
        assert np.allclose(
            pytorch_result, onnx_result,
            atol=1.e-5), 'The outputs are different between Pytorch and ONNX'
        print('The numerical values are same between Pytorch and ONNX')

Sunday, 4 July 2021

How to install remote desktop in ubuntu18?

reference: https://c-nergy.be/blog/?p=13390

Issues with xRDP and Ubuntu 18.04.2 – How to fix it

Hello World, 

Based on the feedback we have received through this blog, it seems that there is some changes that has been introduced in Ubuntu 18.04.2 which seems to break the xRDP capability and people cannot perform the remote desktop connection anymore.  After being presented with the xRDP login page,  only the green background screen is presented to you and will fail eventually.  This issue will occur if you perform a manual installation or if you use the latest version of Std-Xrdp-Install-5.1.sh script.

This post will explain what’s needs to be done in order to fix this issue.  So, let’s go ! 

Overview

Ubuntu 18.04.2 has been released and more and more people are noticing that after installing the xRDP package, they are not able to connect to the desktop interface through remote desktop connection software.  Apparently, Ubuntu 18.04.2 has introduced some changes that preventing xRDP package to work as expected.  We have performed a manual installation to see what could be the problem. 

Problem Description

So, to perform a manual installation, we have opened a terminal console and we have issued the following command 

sudo apt-get install xrdp 

xrdp_issue_0

Click on Picture for Better Resolution

After having performed the installation, we have checked that the xrdp service was running using the following commane 

sudo systemctl status xrdp 
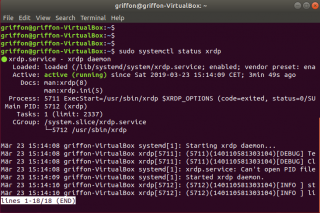
xrdp_issue_5

Click on Picture for Better Resolution

So far, everything seems to be working as expected.  So, we moved to a windows computer, fired up the remote desktop client and as we can see in the screenshot, we are presented with the xrdp login page
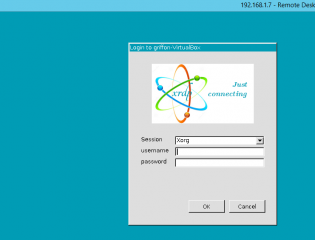
xrdp_issue_1

Click on Picture for Better Resolution

After entering our credentials,  we only see a green background page and nothing happens.  After a certain amount of time (several minutes), you should see the following error message 

connection problem,giving up
some problem
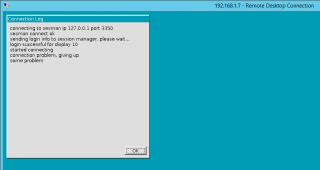
xrdp_issue_2

Click on Picture for Better Resolution

Resolution process

After looking into the logs, it seems that the xorgxrdp component of xRDP is not working as expected.  When we have performed the installation of the xRDP package, we have noticed that information displayed in the console mentionning that xorgxrdp package is needed (see screenshot below).  So, when performing the xrdp installation, it seems that the xorgxrdp package is not installed anymore.
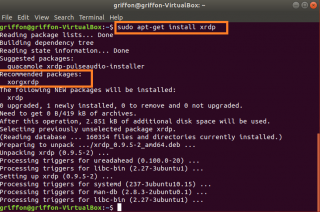
xrdp_issue_3

Click on Picture for Better Resolution

So, it’s seems that the issue encountered is due to the fact that the xorgxrdp package is not installed.  So, moving forward, we have decided to install the xorgxrdp package manually just after installing the xrdp package.  So, we have issued the following command in a Terminal console 

sudo apt-get install xorgxrdp  

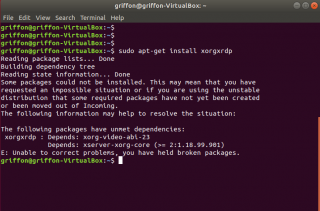
Issuing this command will not perform the installation as there are some dependencies errors

xrdp_issue_4

Click on Picture for Better Resolution

We have just found the root cause issue

The xorgxrdp package cannot be installed because of some missing dependencies. Because we have no xorgxrdp component installed on the computer, it seems logical that when we perform a remote connection, we are never presented with the Ubuntu desktop…

Fixing xRDP on Ubuntu 18.04.2

If you are performing a brand new xRDP installation or if you have installed xRDP and you are encountering the issue, you will need to perform the following actions 

New xRDP installation xRDP already installed
  • Install xserver-xorg-core package
  • Install xsrever-xorg-input-all package
  • Install xRDP package 
  • install xserver-xorg-core package
  • Install xsrever-xorg-input-all package
  • install xorgxrdp package 

New xRDP installation Scenario

So, let’s go into more details.  Let’s assume, you have performed a fresh installation of Ubuntu 18.04.2 and you want to install xRDP package through a manual installation, you will need to perform the following actions.

Step 1 – Install xserver-xorg-core by issuing the following command

sudo apt-get install xserver-xorg-core
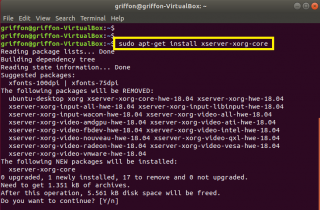
xrdp_issue_6

Click on Picture for Better Resolution

Note : You will notice that installing this package will trigger removal of packages *xserver-xorg-hwe-18.04* which might be used or needed by your system… So, you might loose keyboard and mouse input when connecting locally to the machine.  To fix this issue, you will have to issue the following command just after this one 

sudo apt-get -y install xserver-xorg-input-all

Step 2 – Install xRDP package

sudo apt-get install xrdp

In the screenshot, you can see that because there is no more dependencies issues, the xorgxrdp package is  listed to be installed along with the xRDP package
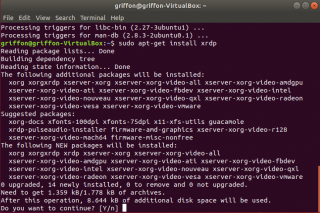
xrdp_issue_7

Click on Picture for Better Resolution

Fixing xRDP installed package

If you have performed the installation of xRDP packages on Ubuntu 18.04.2 using the Std-Xrdp-install-0.5.1.sh script, in order to restore the xrdp functionality, you will need to simply install the missing dependencies by issuing the following command

sudo apt-get install xserver-xorg-core

xrdp_issue_6

Click on Picture for Better Resolution

Note : Again, you will notice that installing this package will trigger removal of 17 packages *xserver-xorg*-hwe-18.04* which might be used or needed by your system…So, you might loose keyboard and mouse input when connecting locally to the machine.  To fix this issue, you will have to issue the following command just after this one 

sudo apt-get -y install xserver-xorg-input-all

After installing the missing dependencies, you will need to manually install the xorgxrdp package in order to restore the xRDP functionality

sudo apt-get install xorgxrdp
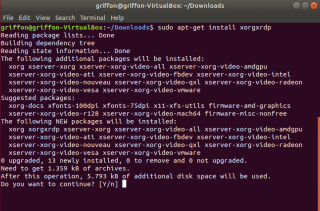
xrdp_issue_8

Click on Picture for Better Resolution

When this is done, you will be able to perform your remote connection against your Ubuntu 18.04.2
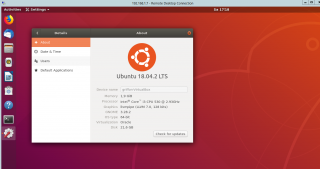
xrdp_issue_9

Click on Picture for Better Resolution


Fixing keyboard and mouse issues in Ubuntu 18.04.2 

After installing xRDP package using the recipe above or if you have used the custom installation script (version 2.2), you might encounter another issue. When login in locally on the ubuntu machine, you will notice that you have lost keyboard and mouse interaction.  Again, as explained above, the fix is quite simple, rune the following command in the terminal session

sudo apt-get -y install xserver-xorg-input-all

Note : As long as you do not reboot after installing the xRDP package, you will not have any problems.  After a reboot, you might loose keyboard and mouse input on your system.  


Final Notes

The addition of the xserver-xorg-hwe-18.04 and associated packages seems to have introduced some dependencies changes that interfere wit the xorgxrdp and xrdp packages version available on Ubuntu repository.  So, if you have used the Std-Xrdp-Install-0.5.1.sh script and you are facing this issue, you will need to manually install the xorgxrdp package.  If you have used the custom installation script (install-xrdp-2.2.sh), you will not have the issue as the script compile and install the xorgxrdp package separately and we are using the latest xrdp and xorgxrdp package version..However, you might also have the keyboard and mouse problem. Again, you will need to re-install the xserver-xorg-input-all package...

It seems that we will need to update the script in order to provide support for Ubuntu 18.04.2 as Ubuntu 18.04 is a Long Term support release.  Please be patient as it might take us some time before we can upload the new version of the script….

Hope this clarify the issue…

Till next time

See ya

Monday, 28 June 2021

How to setup Nvidia ngc in ubuntu18?

wget -O ngccli_cat_linux.zip https://ngc.nvidia.com/downloads/ngccli_cat_linux.zip && unzip -o ngccli_cat_linux.zip && chmod u+x ngc


echo "export PATH=\"\$PATH:$(pwd)\"" >> ~/.bash_profile && source ~/.bash_profile


ngc config set


Sunday, 27 June 2021

How to run docker in docker ubuntu?

docker run --gpus all -it -v /var/run/docker.sock:/var/run/docker.sock -p 8888:8888 nvidia/cuda:11.0-base nvidia-smi

Saturday, 5 June 2021

How to do vector multiplication using a batch size of 4 in C++?

 https://blog.csdn.net/fuwenyan/article/details/77742766


本博记录为卤煮理解,如有疏漏,请指正。转载请注明出处。

卤煮:非文艺小燕儿

本博地址:利用SSE计算向量点乘simd_dot


所谓SSE(Streaming SIMD Extensions),也就是单指令多数据流的扩展。所谓单指令多数据流呢,简单理解就是多个数据流同时处理一条指令。

举个栗子:

一个水箱中的水,底部开1个洞放水,就是单指令单数据流。底部同时开多个相同大小的洞放水,就是单指令多数据流。

多个洞放水当然会比1个洞放得快啦,也就是同样的指令,多数据流速度就快呀。


对于SSE,其实就是处理器中专门开辟了多个128位的寄存器。对于单精度浮点数,占用32bit,那么1个128bit的SSE寄存器,就可以存放4个单精度浮点数。对于单精度浮点数的运算指令,其实就相当于开了4个洞。比如,两个128位的SSE寄存器中存放的数据进行乘法运算,那么一次性就能得到4组运算结果。


大概就是这么个意思。接下来就对采用SSE优化的向量点乘进行详细注释说明。

输入x和y都是长度为len的向量。我们要求x.*y,并将结果返回。
————————————————
版权声明:本文为CSDN博主「非文艺小燕儿_Vivien」的原创文章,遵循CC 4.0 BY-SA版权协议,转载请附上原文出处链接及本声明。
原文链接:https://blog.csdn.net/fuwenyan/article/details/77742766


============

float simd_dot(const float* x, const float* y, const long& len) {
    float inner_prod = 0.0f;
    __m128 X, Y; //声明两个存放在SSE的128位专用寄存器的变量
    __m128 acc = _mm_setzero_ps(); // 声明一个存放在SSE的128位专用寄存器的变量,用来存放X+Y的结果,初始值为0
    float temp[4];//存放中间变量的参数
 
    long i;
    for (i = 0; i + 4 < len; i += 4) {//128位专用寄存器,一次性可以处理4组32位变量的运算
        X = _mm_loadu_ps(x + i); // 将x加载到X(由于128位可以存放四个32位数据,所以默认一次加载连续的4个参数)
        Y = _mm_loadu_ps(y + i);//同上
        acc = _mm_add_ps(acc, _mm_mul_ps(X, Y));//x*y,每轮的x1*y1求和,x2*y2求和,x3*y3求和,x4*y4求和,最终产生的四个和,放在acc的128位寄存器中。
    }
    _mm_storeu_ps(&temp[0], acc); // 将acc中的4个32位的数据加载进内存
    inner_prod = temp[0] + temp[1] + temp[2] + temp[3];//点乘求和
 
    // 刚才只是处理了前4的倍数个元素的点乘,如果len不是4的倍数,那么还有个小尾巴要处理一下
    for (; i < len; ++i) {
        inner_prod += x[i] * y[i];//继续累加小尾巴的乘积
    }
    return inner_prod;//大功告成
}
  

Thursday, 3 June 2021

How To Delete A APT Repository And GPG Key In Ubuntu?

Reference: https://ostechnix.com/how-to-delete-a-repository-and-gpg-key-in-ubuntu/

Delete a repository in Ubuntu

Whenever you add a repository using "add-apt-repository" command, it will be stored in /etc/apt/sources.list file.

To delete a software repository from Ubuntu and its derivatives, just open the /etc/apt/sources.list file and look for the repository entry and delete it.

$ sudo nano /etc/apt/sources.list

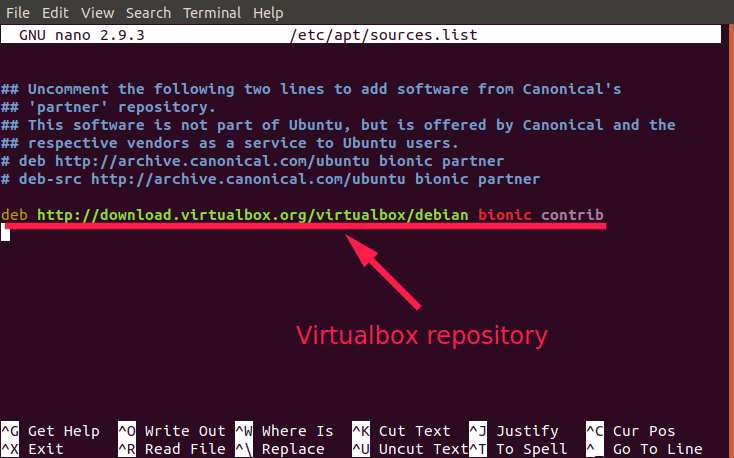
As you can see in the below screenshot, I have added Oracle Virtualbox repository in my Ubuntu system.

virtualbox repository

The contents of /etc/apt/sources.list file

To delete this repository, simply remove the entry. Save and close the file.

If you have added PPA repositories, look into /etc/apt/sources.list.d/ directory and delete the respective entry.

Alternatively, you can delete the repository using "add-apt-repository" command. For example, I am deleting the Systemback repository like below.

$ sudo add-apt-repository -r ppa:nemh/systemback

Finally, update the software sources list using command:

$ sudo apt update
 
===========================================================
 

Delete repository keys in Ubuntu

We use "apt-key" command to add the repository keys. First, let us list the added keys using command:

$ sudo apt-key list

This command will list all added repository keys.

/etc/apt/trusted.gpg -------------------- pub rsa1024 2010-10-31 [SC] 3820 03C2 C8B7 B4AB 813E 915B 14E4 9429 73C6 2A1B uid [ unknown] Launchpad PPA for Kendek pub rsa4096 2016-04-22 [SC] B9F8 D658 297A F3EF C18D 5CDF A2F6 83C5 2980 AECF uid [ unknown] Oracle Corporation (VirtualBox archive signing key) <info@virtualbox.org> sub rsa4096 2016-04-22 [E] /etc/apt/trusted.gpg.d/ubuntu-keyring-2012-archive.gpg ------------------------------------------------------ pub rsa4096 2012-05-11 [SC] 790B C727 7767 219C 42C8 6F93 3B4F E6AC C0B2 1F32 uid [ unknown] Ubuntu Archive Automatic Signing Key (2012) <ftpmaster@ubuntu.com> /etc/apt/trusted.gpg.d/ubuntu-keyring-2012-cdimage.gpg ------------------------------------------------------ pub rsa4096 2012-05-11 [SC] 8439 38DF 228D 22F7 B374 2BC0 D94A A3F0 EFE2 1092 uid [ unknown] Ubuntu CD Image Automatic Signing Key (2012) <cdimage@ubuntu.com> /etc/apt/trusted.gpg.d/ubuntu-keyring-2018-archive.gpg ------------------------------------------------------ pub rsa4096 2018-09-17 [SC] F6EC B376 2474 EDA9 D21B 7022 8719 20D1 991B C93C uid [ unknown] Ubuntu Archive Automatic Signing Key (2018) <ftpmaster@ubuntu.com>

As you can see in the above output, the long (40 characters) hex value is the repository key. If you want APT package manager to stop trusting the key, simply delete it using command:

$ sudo apt-key del "3820 03C2 C8B7 B4AB 813E 915B 14E4 9429 73C6 2A1B"

Or, specify the last 8 characters only:

$ sudo apt-key del 73C62A1B

Done! The repository key has been deleted. Run the following command to update the repository lists:

$ sudo apt update
 

Tuesday, 1 June 2021

How to find, copy and paste files from all subfolders into another folder

  find . -name "*_body.jpg" -exec cp "{}" /home/ninja/temp  \;

Install the pip3 using apt

sudo apt install python3-pip

sudo apt install python3-venv

Using Virtual Environments

To get started, if you’re not using Python 3, you’ll want to install the virtualenv tool with pip:

$ pip3 install pip --upgrade 
$ pip3 install virtualenv

If you are using Python 3, then you should already have the venv module from the standard library installed.


Create a new virtual environment inside the directory:

# Python 2:
$ virtualenv env

# Python 3
$ python3 -m venv env 

In order to use this environment’s packages/resources in isolation, you need to “activate” it. To do this, just run the following:

$ source env/bin/activate
(env) $
 

Monday, 31 May 2021

How to setup a FTP server in Ubuntu?

 Ref: https://www.techrepublic.com/article/how-to-quickly-setup-an-ftp-server-on-ubuntu-18-04/

The VSFTP daemon is found in the standard repositories, so installation can be pulled off with a single command. Open a terminal window and issue the following:

sudo apt-get install vsftpd

Start and enable the service with the commands:

sudo systemctl start vsftpd
sudo systemctl enable vsftpd

Once that installation completes, you're ready to continue.

Creating an FTP user

We're going to make this very easy and create a user for the FTP service that you can then give out to those who need it (and don't have a user account on the server). This could be considered an account for generic FTP usage. You can always create more, and anyone with a user account on the server can log via FTP. Our user will be called ftpuser and is created with the command:

sudo useradd -m ftpuser

Set the user's password with the command:

sudo passwd ftpuser

Your user is ready to go.

Configuring VSFTP

We're going to create a brand new configuration file. Before we do that, let's rename the original with the command:

sudo mv /etc/vsftpd.conf /etc/vsftpd.conf.orig

Create the new file with the command:

sudo nano /etc/vsftpd.conf

In that file, place the following:

listen=NO
listen_ipv6=YES
anonymous_enable=NO
local_enable=YES
write_enable=YES
local_umask=022
dirmessage_enable=YES
use_localtime=YES
xferlog_enable=YES
connect_from_port_20=YES
chroot_local_user=YES
secure_chroot_dir=/var/run/vsftpd/empty
pam_service_name=vsftpd
rsa_cert_file=/etc/ssl/certs/ssl-cert-snakeoil.pem
rsa_private_key_file=/etc/ssl/private/ssl-cert-snakeoil.key
ssl_enable=NO
pasv_enable=Yes
pasv_min_port=10000
pasv_max_port=10100
allow_writeable_chroot=YES

Logging in

At this point, you should be able to log into your FTP server using the ftpuser created earlier. Login with your favorite FTP GUI client or the command line. You can now upload and download files to your heart's content. Those files will be saved in the home directory of the ftpuser user (so /home/ftpuser). With our configuration file, we've disabled anonymous usage, so the only way to log in will be with a working account on the server.

Done and done

That's it. In about a minute, you've created an FTP server on Ubuntu 18.04. It really is that easy. Remember, however, this is pretty basic. The goal was to get it up and running quickly, so you might find it doesn't perfectly fit your needs. Fortunately, VSFTP is a fairly flexible server. To learn more about what this FTP server can do, issue the command man vsftpd.

Saturday, 29 May 2021

How to use Nvidia Triton Inference Server?

ubuntu16/18, driver 440.33.01, nvcr.io/nvidia/tritonserver:20.03-py3, NVIDIA Triton Inference Server 1.12.0
======

step: pull the triton docker
> docker pull nvcr.io/nvidia/tritonserver:20.03-py3

step: download the model example
> git clone https://github.com/triton-inference-server/server.git
(triton server root: /home/ninja/server)
> git checkout r20.03
> cd /home/ninja/server/docs/examples
> ./fetch_models.sh
(to check the model configuration, go to /home/ninja/server/docs/examples/model_repository/*)
> cd /home/ninja/server/docs/examples
> mkdir -p ensemble_model_repository/preprocess_resnet50_ensemble/1

step: up the triton server
> docker run --gpus=1 --rm -p8000:8000 -p8001:8001 -p8002:8002 -v/home/ninja/server/docs/examples/model_repository:/models nvcr.io/nvidia/tritonserver:20.03-py3 trtserver --model-repository=/models

or

> docker run --rm --shm-size=1g --ulimit memlock=-1 --ulimit stack=67108864 -p8000:8000 -p8001:8001 -p8002:8002 -v/home/ninja/server/docs/examples/model_repository:/models nvcr.io/nvidia/tritonserver:20.03-py3 trtserver --model-repository=/models

docker: Error response from daemon: could not select device driver "" with capabilities: [[gpu]].
> sudo apt install nvidia-container-toolkit
> sudo systemctl restart docker

step: check the triton server status
> curl localhost:8000/api/status
(ready_state: SERVER_READY)

step: pull and run the client example
> docker run -it --rm --net=host nvcr.io/nvidia/tritonserver:20.03-py3-clientsdk
(inside docker now)
> root@luke:/workspace#

======

step: run the model inference
> root@luke:/workspace# image_client -m resnet50_netdef -s INCEPTION /workspace/images/mug.jpg

or using python

> cd /workspace/src/clients/python/api_v1/examples
> root@luke:/workspace/src/clients/python/api_v1/examples# python image_client.py -m resnet50_netdef -s INCEPTION /workspace/images/mug.jpg

or using GRPC instead of HTTP as previous two examples

> root@luke:/workspace# image_client -i grpc -u localhost:8001 -m resnet50_netdef -s INCEPTION /workspace/images/mug.jpg

or using -c to see more top n classification results

> root@luke:/workspace# image_client -m resnet50_netdef -s INCEPTION -c 5 /workspace/images/mug.jpg

or the -b flag allows you to send a batch of images for inferencing

> root@luke:/workspace# image_client -m resnet50_netdef -s INCEPTION -c 3 -b 2 /workspace/images/mug.jpg

or provide a directory instead of a single image to perform inferencing on all images in the directory

> root@luke:/workspace# image_client -i grpc -u localhost:8001 -m densenet_onnx -c 5 -s INCEPTION /workspace/images/

or Ensemble Image Classification Example Application ???, need to restart docker ???

> ensemble_image_client /workspace/images/mug.jpg


======

step: to benchmark the model
root@luke:/workspace# perf_client -m resnet50_netdef --concurrency-range 1:4 -f perf.csv
root@luke:/workspace# cp perf.csv /temp (host directory)
(then, make a copy https://docs.google.com/spreadsheets/d/1IsdW78x_F-jLLG4lTV0L-rruk0VEBRL7Mnb-80RGLL4/edit#gid=1572240508)
(and, import the perf.csv into google docs copy)

step: how to use dynamic batching and multiple instances of a single model
https://docs.nvidia.com/deeplearning/triton-inference-server/archives/triton_inference_server_1120/triton-inference-server-guide/docs/optimization.html

example of dynamic batching and multiple instances for config.pbtxt, need to restart triton-client docker
name: "resnet50_netdef"
platform: "caffe2_netdef"
max_batch_size: 128
dynamic_batching { preferred_batch_size: [ 4 ] }
instance_group [ { count: 2 }]
input [
  {
    name: "gpu_0/data"
    data_type: TYPE_FP32
    format: FORMAT_NCHW
    dims: [ 3, 224, 224 ]
  }
]
output [
  {
    name: "gpu_0/softmax"
    data_type: TYPE_FP32
    dims: [ 1000 ]
    label_filename: "resnet50_labels.txt"
  }
]

root@luke:/workspace# perf_client -m resnet50_netdef --concurrency-range 4

reference:
- https://github.com/triton-inference-server/server/blob/main/docs/quickstart.md
- https://docs.nvidia.com/deeplearning/triton-inference-server/archives/triton_inference_server_1120/triton-inference-server-guide/docs/run.html#checking-inference-server-status

Friday, 28 May 2021

Python's os and subprocess Popen Commands

 https://stackabuse.com/pythons-os-and-subprocess-popen-commands/

Friday, 21 May 2021

Resolve ‘rodata' can not be used when making a PIE object; recompile with -fPIC?

 1. Question
       When I use Ubuntu18.04 desktop operating system to compile "Onenet Video SDK"(https://github.com/cm-heclouds/video_sdk),I encountered an problem as below:

/usr/bin/ld: ../../lib/linux/libmbedcrypto.a(bignum.c.o): relocation R_X86_64_32S against `.rodata' can not be used when making a PIE object; recompile with -fPIC
/usr/bin/ld: ../../lib/linux/libmbedcrypto.a(ctr_drbg.c.o): relocation R_X86_64_32 against `.rodata' can not be used when making a PIE object; recompile with -fPIC
/usr/bin/ld: ../../lib/linux/libmbedcrypto.a(entropy.c.o): relocation R_X86_64_32 against symbol `mbedtls_platform_entropy_poll' can not be used when making a PIE object; recompile with -fPIC
/usr/bin/ld: ../../lib/linux/libmbedcrypto.a(entropy_poll.c.o): relocation R_X86_64_32 against `.rodata' can not be used when making a PIE object; recompile with -fPIC
/usr/bin/ld: ../../lib/linux/libmbedcrypto.a(rsa.c.o): relocation R_X86_64_32 against `.rodata' can not be used when making a PIE object; recompile with -fPIC
/usr/bin/ld: ../../lib/linux/libmbedcrypto.a(sha1.c.o): relocation R_X86_64_32 against `.rodata' can not be used when making a PIE object; recompile with -fPIC
/usr/bin/ld: ../../lib/linux/libmbedcrypto.a(sha512.c.o): relocation R_X86_64_32S against `.rodata' can not be used when making a PIE object; recompile with -fPIC
/usr/bin/ld: ../../lib/linux/libmbedcrypto.a(timing.c.o): relocation R_X86_64_32 against `.text' can not be used when making a PIE object; recompile with -fPIC
/usr/bin/ld: ../../lib/linux/libmbedcrypto.a(aes.c.o): relocation R_X86_64_32S against `.bss' can not be used when making a PIE object; recompile with -fPIC
/usr/bin/ld: ../../lib/linux/libmbedcrypto.a(md.c.o): relocation R_X86_64_32 against `.rodata' can not be used when making a PIE object; recompile with -fPIC
/usr/bin/ld: ../../lib/linux/libmbedcrypto.a(oid.c.o): relocation R_X86_64_32S against `.rodata' can not be used when making a PIE object; recompile with -fPIC
/usr/bin/ld: ../../lib/linux/libmbedcrypto.a(ripemd160.c.o): relocation R_X86_64_32 against `.rodata' can not be used when making a PIE object; recompile with -fPIC
/usr/bin/ld: ../../lib/linux/libmbedcrypto.a(sha256.c.o): relocation R_X86_64_32S against `.rodata' can not be used when making a PIE object; recompile with -fPIC
/usr/bin/ld: ../../lib/linux/libmbedcrypto.a(md5.c.o): relocation R_X86_64_32 against `.rodata' can not be used when making a PIE object; recompile with -fPIC
onvif/libonvif_s.a(stdsoap2.c.o): In function `soap_ssl_init':
stdsoap2.c:(.text+0x68b5): undefined reference to `SSL_library_init'
stdsoap2.c:(.text+0x68ba): undefined reference to `OPENSSL_add_all_algorithms_noconf'
stdsoap2.c:(.text+0x68bf): undefined reference to `SSL_load_error_strings'
onvif/libonvif_s.a(stdsoap2.c.o): In function `ssl_auth_init':
stdsoap2.c:(.text+0x6b54): undefined reference to `SSLv23_method'
onvif/libonvif_s.a(stdsoap2.c.o): In function `tcp_connect':
stdsoap2.c:(.text+0x9612): undefined reference to `SSL_state'
stdsoap2.c:(.text+0x97e3): undefined reference to `sk_pop_free'
stdsoap2.c:(.text+0x9811): undefined reference to `sk_value'
stdsoap2.c:(.text+0x988f): undefined reference to `sk_num'
stdsoap2.c:(.text+0x98b1): undefined reference to `sk_pop_free'
onvif/libonvif_s.a(mecevp.c.o): In function `soap_mec_init':
mecevp.c:(.text+0x76): undefined reference to `EVP_CIPHER_CTX_init'
onvif/libonvif_s.a(mecevp.c.o): In function `soap_mec_cleanup':
mecevp.c:(.text+0x433): undefined reference to `EVP_CIPHER_CTX_cleanup'
onvif/libonvif_s.a(smdevp.c.o): In function `soap_smd_init':
smdevp.c:(.text+0x33d): undefined reference to `HMAC_CTX_init'
smdevp.c:(.text+0x395): undefined reference to `EVP_MD_CTX_init'
onvif/libonvif_s.a(smdevp.c.o): In function `soap_smd_final':
smdevp.c:(.text+0x76a): undefined reference to `HMAC_CTX_cleanup'
smdevp.c:(.text+0x77c): undefined reference to `EVP_MD_CTX_cleanup'
onvif/libonvif_s.a(smdevp.c.o): In function `soap_smd_check':
smdevp.c:(.text+0x844): undefined reference to `HMAC_CTX_cleanup'
smdevp.c:(.text+0x856): undefined reference to `EVP_MD_CTX_cleanup'
/usr/bin/ld: final link failed: Symbol needs debug section which does not exist
collect2: error: ld returned 1 exit status
sample/CMakeFiles/sample_video_s.dir/build.make:373: recipe for target '../bin/sample_video_s' failed
make[2]: *** [../bin/sample_video_s] Error 1
CMakeFiles/Makefile2:225: recipe for target 'sample/CMakeFiles/sample_video_s.dir/all' failed
make[1]: *** [sample/CMakeFiles/sample_video_s.dir/all] Error 2
Makefile:83: recipe for target 'all' failed
make: *** [all] Error 2


2. Analysis:
        It is inferred that the trouble should be positioned in linking procedure. The specialize static library "libmbedcrypto.a" was ever compiled without option "fPIC", but the present system compiler turns on this function definitely. So we can see from log that it recommends recompile with -fPIC.


 3. Resolution
        If we use CMake tool to help compile, we can just add an "-no-pie" to linker flags:
SET(CMAKE_EXE_LINKER_FLAGS " -no-pie")
Job done.


4.  Summarize knowledge
        PIE full name is "Position Independent Executable", which is used to create an media between common executable and common shared library. This kind of code can relocate space just as common shared library, and it must be linked to Scrt1.o.
Details can be referred to https://blog.csdn.net/ivan240/article/details/5363395.
————————————————
版权声明:本文为CSDN博主「如月灵」的原创文章,遵循CC 4.0 BY-SA版权协议,转载请附上原文出处链接及本声明。
原文链接:https://blog.csdn.net/hanyulongseucas/article/details/87715186

Friday, 14 May 2021

CUDA_CUDA_LIBRARY, CUDA_nvcuvid_LIBRARY, cudacodec, CMake Generate step failed?

CMake Error: The following variables are used in this project, but they are set to NOTFOUND.
Please set them or make sure they are set and tested correctly in the CMake files:
CUDA_CUDA_LIBRARY (ADVANCED)
    linked by target "opencv_cudacodec" in directory /home/ccng/workspace/opencv_contrib-4.4.0/modules/cudacodec
CUDA_nvcuvid_LIBRARY (ADVANCED)
    linked by target "opencv_cudacodec" in directory /home/ccng/workspace/opencv_contrib-4.4.0/modules/cudacodec

-- Generating done
CMake Generate step failed.  Build files cannot be regenerated correctly.


============================


This bug is due to the nvcuvid and nvidia-encode not set in a correct path.


step1: download the correct driver and library into a specific path:-

For nvidia driver 450, cuda10.2 and gpu2080ti:-

download video_codec_sdk from NVIDIA (***very important***)
cd /home/ninja/installer/Video_Codec_SDK_10.0.26/Interface
sudo cp ./* /usr/local/cuda-10.2/include
cd /home/ccng/installer/Video_Codec_SDK_10.0.26/Interface
sudo cp ./* /usr/local/cuda-10.2/targets/x86_64-linux/lib/stubs
(make sure libnvidia-encode.so and libnvcuvid.so are inside the folder)
sudo ln -s /usr/local/cuda-10.2/targets/x86_64-linux/lib/stubs/libnvcuvid.so /usr/local/cuda-10.2/targets/x86_64-linux/lib/stubs/libnvcuvid.so.1
sudo ln -s /usr/local/cuda-10.2/targets/x86_64-linux/lib/stubs/libnvidia-encode.so /usr/local/cuda-10.2/targets/x86_64-linux/lib/stubs/libnvidia-encode.so.1


step2: adding the following configuration in opencv cmake:-

        -DCMAKE_LIBRARY_PATH=/usr/local/cuda-10.2/targets/x86_64-linux/lib/stubs \
        -DCUDA_nvcuvid_LIBRARY=/usr/local/cuda-10.2/targets/x86_64-linux/lib/stubs/libnvcuvid.so.1 \
        -DCUDA_nvcuvenc_LIBRARY=/usr/local/cuda-10.2/targets/x86_64-linux/lib/stubs/libnvidia-encode.so \
        -DCUDA_nvcuvid_LIBRARIES=/usr/local/cuda-10.2/targets/x86_64-linux/lib/stubs/libnvcuvid.so \
        -DCUDA_nvcuvenc_LIBRARIES=/usr/local/cuda-10.2/targets/x86_64-linux/lib/stubs/libnvidia-encode.so \

Tuesday, 11 May 2021

How to list videos and concate them into a single video?

for f in ./ch08*.sdv; do echo "file '$PWD/$f'" >> file.txt ; done


concate and convert using nvidia encode and decode:-

ffmpeg -y -vsync 0 -hwaccel cuvid -c:v h264_cuvid -f concat -safe 0 -i ch08.txt -c:v h264_nvenc ch08.mp4

How to use terminal to list the files and save into a text file?

for f in ./*.mp4; do echo "file '$PWD/$f'" >> file.txt ; done


Thursday, 29 April 2021

How to do multiprocessing in python?

import pickle
import numpy as np
import glob, gzip
import multiprocessing as mp
from functools import partial
import tqdm

def daemon(paths, idx):
    item = paths[idx].split(' ')
    data = pickle.load(gzip.open(item[0], 'rb'))
    images = data.astype(np.float32)
    print(item[0], images.shape)

root = '/data/ninja/workspace/data/boyshome/train.txt'
ifile = open(root)
files = ifile.readlines()
indices = list(range(len(files)))

worker = partial(daemon, files)
pool = mp.Pool(24)
tqdm.tqdm(pool.map(func=worker, iterable=indices))
pool.close()
pool.join()

Wednesday, 28 April 2021

How to process all files in a folder?

for i in *.avi; do ffmpeg -i "$i" -vcodec libx264 "${i%.*}_.mp4"; done

Tuesday, 20 April 2021

How to remove the files if list is too long in ubuntu?

(base) temp@temp:~/temp$ rm -r ./*
bash: /bin/rm: Argument list too long
(base) temp@temp:~/temp$ find . -type f -name '*.*' | xargs rm
(base) temp@temp:~/temp$ ls

Sunday, 18 April 2021

How to install Nvidia driver in a proper way?

Ref: https://docs.nvidia.com/datacenter/tesla/tesla-installation-notes/index.html

This section includes instructions for installing the NVIDIA driver on Ubuntu 16.04 LTS and Ubuntu 18.04 LTS distributions using the package manager.

  1. The NVIDIA driver requires that the kernel headers and development packages for the running version of the kernel be installed at the time of the driver installation, as well whenever the driver is rebuilt. For example, if your system is running kernel version 4.4.0, the 4.4.0 kernel headers and development packages must also be installed. The kernel headers and development packages for the currently running kernel can be installed with:
    $ sudo apt-get install linux-headers-$(uname -r)
  2. Ensure packages on the CUDA network repository have priority over the Canonical repository.
    $ distribution=$(. /etc/os-release;echo $ID$VERSION_ID | sed -e 's/\.//g')
    $ wget https://developer.download.nvidia.com/compute/cuda/repos/$distribution/x86_64/cuda-$distribution.pin
    $ sudo mv cuda-$distribution.pin /etc/apt/preferences.d/cuda-repository-pin-600
  3. Install the CUDA repository public GPG key. Note that on Ubuntu 16.04, replace https with http in the command below.
    $ sudo apt-key adv --fetch-keys https://developer.download.nvidia.com/compute/cuda/repos/$distribution/x86_64/7fa2af80.pub
  4. Setup the CUDA network repository.
    $ echo "deb http://developer.download.nvidia.com/compute/cuda/repos/$distribution/x86_64 /" | sudo tee /etc/apt/sources.list.d/cuda.list
  5. Update the APT repository cache and install the driver using the cuda-drivers meta-package. Use the --no-install-recommends option for a lean driver install without any dependencies on X packages. This is particularly useful for headless installations on cloud instances.
    $ sudo apt-get update
    $ sudo apt-get -y install cuda-drivers
  6. Follow the post-installation steps in the CUDA Installation Guide for Linux to setup environment variables, NVIDIA persistence daemon (recommended) and to verify the successful installation of the driver.

Sunday, 11 April 2021

How to convert indices to one hot encoding, or vice versa?

from sklearn.metrics import accuracy_score, confusion_matrix, classification_report

def indices_to_one_hot(data, nb_classes):
    """Convert an iterable of indices to one-hot encoded labels."""
    targets = np.array(data).reshape(-1)
    return np.eye(nb_classes)[targets]

def one_hot_to_indices(data):
    return np.argmax(data, axis=1)


#########################################

pred = one_hot_to_indices(one_hot_pred)
targ = one_hot_to_indices(one_hot_label)
prec1 = accuracy_score(pred, targ) # [0,1,1,0], [0,0,1,0]

cf = confusion_matrix(video_labels, video_pred).astype(float)
cr = classification_report(video_labels, video_pred)
print('confusion_matrix')
print(cf)
print('classification_report')
print(cr)

np.save('cm.npy', cf)
cls_cnt = cf.sum(axis=1)
cls_hit = np.diag(cf)

cls_acc = cls_hit / cls_cnt
print(cls_acc)
upper = np.mean(np.max(cf, axis=1) / cls_cnt)
print('upper bound: {}'.format(upper))

print('-----Evaluation is finished------')
print('Class Accuracy {:.02f}%'.format(np.mean(cls_acc) * 100))
print('Overall Prec@1 {:.02f}%'.format(top1.avg))


Friday, 9 April 2021

To check the status of a FOR looping

You can try to use tqdm.tqdm

for file in tqdm.tqdm(files):

    print(file)


Friday, 26 March 2021

Wednesday, 24 March 2021

How to change docker image directory path?

ref: https://www.guguweb.com/2019/02/07/how-to-move-docker-data-directory-to-another-location-on-ubuntu/


If you want to move the docker data directory on another location you can follow the following simple steps.

1. Stop the docker daemon

sudo service docker stop

2. Add a configuration file to tell the docker daemon what is the location of the data directory

Using your preferred text editor add a file named daemon.json under the directory /etc/docker. The file should have this content:

sudo vi /etc/docker/daemon.json

{
    "data-root": "/home/ninja/docker/",
    "runtimes": {
        "nvidia": {
            "path": "nvidia-container-runtime",
            "runtimeArgs": []
        }
    }
}

of course you should customize the location “/path/to/your/docker” with the path you want to use for your new docker data directory.

3. Copy the current data directory to the new one

sudo rsync -aP /var/lib/docker/ /path/to/your/docker

4. Rename the old docker directory

sudo mv /var/lib/docker /var/lib/docker.old

This is just a sanity check to see that everything is ok and docker daemon will effectively use the new location for its data.

5. Restart the docker daemon

sudo service docker start

6. Test

If everything is ok you should see no differences in using your docker containers. When you are sure that the new directory is being used correctly by docker daemon you can delete the old data directory.

sudo rm -rf /var/lib/docker.old

Follow the previous steps to move docker data directory and you won’t risk any more to run out of space in your root partition, and you’ll happily use your docker containers for many years to come. 😉


How to mount the remote folder into a local folder?

sshfs -o big_writes user@192.168.1.123:/remote/folder/ /home/ninja/local/folder

Monday, 15 March 2021

How to sort file name according to numerical order in python?


import numpy as np
import glob
from natsort import natsorted

for file in natsorted(glob.glob("before_255/*")):
print(file)
 
---
 
before_255/0.npy
before_255/1.npy
before_255/2.npy
before_255/3.npy
before_255/4.npy
before_255/5.npy
before_255/6.npy
before_255/7.npy
before_255/8.npy
before_255/9.npy
before_255/10.npy
before_255/11.npy
before_255/12.npy
before_255/13.npy
before_255/14.npy
before_255/15.npy
before_255/16.npy
before_255/17.npy
before_255/18.npy
before_255/19.npy
before_255/20.npy 

How to compress video to mp4 using FFMPEG?

ffmpeg -i input.name -vcodec libx264 output.mp4

ffmpeg -i input.name -vcodec mpeg4 output.mp4

(these videos are playable by browser)


 ffmpeg -i input.mp4 -vcodec libx265 -crf 28 output.mp4

Tuesday, 9 March 2021

Monday, 8 March 2021

 CMake Error: The following variables are used in this project, but they are set to NOTFOUND.
Please set them or make sure they are set and tested correctly in the CMake files:
CUDA_CUDA_LIBRARY (ADVANCED)
    linked by target "opencv_cudacodec" in directory /home/user/workspace/opencv_contrib-4.4.0/modules/cudacodec


 CMake Error: The following variables are used in this project, but they are set to NOTFOUND.
Please set them or make sure they are set and tested correctly in the CMake files:CUDA_nvcuvid_LIBRARY (ADVANCED)
    linked by target "opencv_cudacodec" in directory /home/user/workspace/opencv_contrib-4.4.0/modules/cudacodec


 CMake Error: The following variables are used in this project, but they are set to NOTFOUND.
Please set them or make sure they are set and tested correctly in the CMake files:CUDA_nvcuvenc_LIBRARY (ADVANCED)
    linked by target "opencv_cudacodec" in directory /home/user/workspace/opencv_contrib-4.4.0/modules/cudacodec
 

1. check the libcuda, libnvcuvid and libnvidia-encode found in the system. Remove them all except the one under /usr/lib/x86_64-linux-gnu which corresponds to nvidia-smi driver version, the non related one just remove


2. version tested as following:-

version 1:

gpu 3090, ubuntu18, nvidia-smi 455.32.00, /usr/lib/x86_64-linux-gnu/libcuda.so  /usr/lib/x86_64-linux-gnu/libcuda.so.1, /usr/lib/x86_64-linux-gnu/libcuda.so.455.32.00, /usr/local/cuda-11.0/lib64/libnvcuvid.so, /usr/local/cuda-11.0/lib64/libnvcuvid.so.455.32.00, /usr/local/cuda-11.0/lib64/libnvcuvid.so.1


version 2:


Sunday, 7 March 2021

How to use FFMPEG to stream RTSP into a video?

A Simple Way:

ffmpeg -i rtsp://192.168.80.112 -r 30 -vcodec copy -an -t 60 temp.mp4

ffmpeg -i rtsp://192.168.80.112 -b 900k -vcodec copy -r 60 -y MyVdeoFFmpeg.avi

ffmpeg -i rtsp://192.168.80.112 -acodec copy -vcodec copy ./abc.mp4


Simple Stream to file

Simple stream to file. Full resolution

ffmpeg -loglevel debug -rtsp_transport tcp -i "rtsp://admin:admin@198.175.207.61:554/live" \
-c copy -map 0 foo.mp4

Break streamed file into time segments

ffmpeg can save file in arbitrary segments at fixed intervals. In this example, we save a new file at 10 second intervals, but the value for segment_time can be any positive integer

ffmpeg  -rtsp_transport tcp -i "rtsp://admin:admin@198.175.207.61:554/live"  \
-f segment -segment_time 10 -segment_format mp4 -reset_timestamps 1 \
-c copy -map 0 test%d.mp4

Timestamped output

Output files can be timestamped as well.

ffmpeg  -rtsp_transport tcp -i "rtsp://admin:admin@198.175.207.135:554/live" \
-f segment -segment_time 10 -segment_format mp4  -reset_timestamps 1 \
-strftime 1 -c copy -map 0 dauphine-%Y%m%d-%H%M%S.mp4

Select stream to read from.

A different url is used to select the substream. Set subtype to 0 for main hi-res stream, or 1 for low res substream. Channel looks to always be set to 1

ffmpeg  -rtsp_transport tcp -i "rtsp://admin:admin@198.175.207.135:554/cam/realmonitor?channel=1&subtype=1" \ 
-f segment -segment_time 10 -segment_format mp4  -reset_timestamps 1 \ 
-strftime 1 -c copy -map 0 test-%Y%m%d-%H%M%S.mp4 
 
p/s: copied from https://gist.github.com/mowings/6960b8058daf44be1b4e 

Wednesday, 3 March 2021

How to convert to opencv Mat to float based on NCHW in C++?

 void convertToVector(cv::Mat &img, std::vector<float> &values, int count)
{
    std::vector<float> normalize(3, 1);
    normalize = {255, 255, 255};
    std::vector<float> mean(3, 0);
    std::vector<float> std(3, 1);
    bool bgrtorgb = false;
    int size = img.cols * img.rows;
    int channel = img.channels();
    std::cout << size << " " << channel << std::endl;

    //    for (int i = 0; i < steps.size(); i++) {
    //      auto step = steps[i];
    //      if (step == "subtract128") {
    //        mean = {128, 128, 128};
    //        std = {1, 1, 1};
    //        normalize = {1, 1, 1};
    //      } else if (step == "normalize") {
    //        normalize = {255, 255, 255};
    //      } else if (step == "mean") {
    //        mean = {0.406f, 0.456f, 0.485f};
    //      } else if (step == "std") {
    //        std = {0.225f, 0.224f, 0.229f};
    //      } else if (step == "bgrtorgb") {
    //        bgrtorgb = true;
    //      } else {
    //        CAFFE_ENFORCE(
    //            false,
    //            "Unsupported preprocess step. The supported steps are: subtract128, "
    //            "normalize,mean, std, swaprb.");
    //      }
    //    }

    int C = channel ? 3 : 1;
    int total_size = C * size;
    // std::vector<float> values(total_size);
    if (C == 1)
    {
        cv::MatIterator_<float> it, end;
        int idx = 0;
        for (it = img.begin<float>(), end = img.end<float>(); it != end; ++it)
        {
            values[idx++] = (*it / normalize[0]);
        }
    }
    else
    {
        int i = count;
            
        cv::Mat_<cv::Vec3b>::iterator it, end;
        int b = bgrtorgb ? 2 : 0;
        int g = 1;
        int r = bgrtorgb ? 0 : 2;
        for (it = img.begin<cv::Vec3b>(), end = img.end<cv::Vec3b>(); it != end; ++it, i++)
        {
            //std::cout << (int)(*it)[b] << " " << (int)(*it)[g] << " " << (int)(*it)[r] << std::endl;
            values[i] = (((*it)[b] / normalize[0]));
            int offset = size + i;
            values[offset] = (((*it)[g] / normalize[1]));
            offset = size + offset;
            values[offset] = (((*it)[r] / normalize[2]));
        }
    }
}

Sunday, 28 February 2021

How to compare two arrays is the same in Python?

 np.testing.assert_allclose(to_numpy(img1y), ort_outs[0], rtol=1e-03, atol=1e-05)

Saturday, 13 February 2021

How to run distributed data parallel (DDP) training using Pytorch?

step 1: generate the keygen in main machine

ssh-keygen -t rsa


step 2: copy paste the id_rsa and id_rsa.pub from main machine ~/.ssh to the child machine ~/.ssh (or remote machines)


step 3: setup the ssh connection from main machine to child machine, and child machine to machine

eg1

(in main machine): 

cat ~/.ssh/id_rsa.pub | ssh USER@CHILD1_IP "mkdir -p ~/.ssh && cat >> ~/.ssh/authorized_keys"
cat ~/.ssh/id_rsa.pub | ssh USER@CHILD2_IP "mkdir -p ~/.ssh && cat >> ~/.ssh/authorized_keys"


(in child machine): 

cat ~/.ssh/id_rsa.pub | ssh USER@MAIN_IP "mkdir -p ~/.ssh && cat >> ~/.ssh/authorized_keys"


step 4: test the ssh connection, open a terminal and type

ssh 192.168.x.x (it should connect automatically to that ip address)

otherwise, use "ssh -vvv ip_address" to check the issue


step 5: install the same cuda, cudnn, nccl and conda environment in all machines


step 6: run the code in main machine, then run the code in child machine. If everything is ok, you should see a change in nvidia-smi in both machines

reference: https://cv.gluon.ai/build/examples_torch_action_recognition/ddp_pytorch.html

How to run the conda init from a bash script?


eval "$(conda shell.bash hook)"
conda activate gluoncv
python test_ddp_pytorch.py --config i3d_resnet50_v1_kinetics400.yaml


How to measure flops, #parameters, fps and latency?

 """4. Computing FLOPS, latency and fps of a model
=======================================================

It is important to have an idea of how to measure a video model's speed, so that you can choose the model that suits best for your use case.
In this tutorial, we provide two simple scripts to help you compute (1) FLOPS, (2) number of parameters, (3) fps and (4) latency.
These four numbers will help you evaluate the speed of this model.
To be specific, FLOPS means floating point operations per second, and fps means frame per second.
In terms of comparison, (1) FLOPS, the lower the better,
(2) number of parameters, the lower the better,
(3) fps, the higher the better,
(4) latency, the lower the better.


In terms of input, we use the setting in each model's training config.
For example, I3D models will use 32 frames with stride 2 in crop size 224, but R2+1D models will use 16 frames with stride 2 in crop size 112.
This will make sure that the speed performance here correlates well with the reported accuracy number.
We list these four numbers and the models' accuracy on Kinetics400 dataset in the table below.


+----------------------------------------+----------------+------------+---------------------+-----------------+-----------------+
|  Model                                 | FLOPS          | # params   | fps                 | Latency         | Top-1 Accuracy  |
+========================================+================+============+=====================+=================+=================+
| resnet18_v1b_kinetics400               | 1.819          | 11.382     | 264.01              | 0.0038          | 66.73           |
+----------------------------------------+----------------+------------+---------------------+-----------------+-----------------+
| resnet34_v1b_kinetics400               | 3.671          | 21.49      | 151.96              | 0.0066          | 69.85           |
+----------------------------------------+----------------+------------+---------------------+-----------------+-----------------+
| resnet50_v1b_kinetics400               | 4.110          | 24.328     | 114.05              | 0.0088          | 70.88           |
+----------------------------------------+----------------+------------+---------------------+-----------------+-----------------+
| resnet101_v1b_kinetics400              | 7.833          | 43.320     | 59.56               | 0.0167          | 72.25           |
+----------------------------------------+----------------+------------+---------------------+-----------------+-----------------+
| resnet152_v1b_kinetics400              | 11.558         | 58.963     | 36.93               | 0.0271          | 72.45           |
+----------------------------------------+----------------+------------+---------------------+-----------------+-----------------+
| i3d_resnet50_v1_kinetics400            | 33.275         | 28.863     | 1719.50             | 0.0372          | 74.87           |
+----------------------------------------+----------------+------------+---------------------+-----------------+-----------------+
| i3d_resnet101_v1_kinetics400           | 51.864         | 52.574     | 1137.74             | 0.0563          | 75.10           |
+----------------------------------------+----------------+------------+---------------------+-----------------+-----------------+
| i3d_nl5_resnet50_v1_kinetics400        | 47.737         | 38.069     | 1403.16             | 0.0456          | 75.17           |
+----------------------------------------+----------------+------------+---------------------+-----------------+-----------------+
| i3d_nl10_resnet50_v1_kinetics400       | 62.199         | 42.275     | 1200.69             | 0.0533          | 75.93           |
+----------------------------------------+----------------+------------+---------------------+-----------------+-----------------+
| i3d_nl5_resnet101_v1_kinetics400       | 66.326         | 61.780     | 999.94              | 0.0640          | 75.81           |
+----------------------------------------+----------------+------------+---------------------+-----------------+-----------------+
| i3d_nl10_resnet101_v1_kinetics400      | 80.788         | 70.985     | 890.33              | 0.0719          | 75.93           |
+----------------------------------------+----------------+------------+---------------------+-----------------+-----------------+
| i3d_slow_resnet50_f8s8_kinetics400     | 41.919         | 32.454     | 1702.60             | 0.0376          | 74.41           |
+----------------------------------------+----------------+------------+---------------------+-----------------+-----------------+
| i3d_slow_resnet50_f16s4_kinetics400    | 83.838         | 32.454     | 1406.00             | 0.0455          | 76.36           |
+----------------------------------------+----------------+------------+---------------------+-----------------+-----------------+
| i3d_slow_resnet50_f32s2_kinetics400    | 167.675        | 32.454     | 860.74              | 0.0744          | 77.89           |
+----------------------------------------+----------------+------------+---------------------+-----------------+-----------------+
| i3d_slow_resnet101_f8s8_kinetics400    | 85.675         | 60.359     | 1114.22             | 0.0574          | 76.15           |
+----------------------------------------+----------------+------------+---------------------+-----------------+-----------------+
| i3d_slow_resnet101_f16s4_kinetics400   | 171.348        | 60.359     | 876.20              | 0.0730          | 77.11           |
+----------------------------------------+----------------+------------+---------------------+-----------------+-----------------+
| i3d_slow_resnet101_f32s2_kinetics400   | 342.696        | 60.359     | 541.16              | 0.1183          | 78.57           |
+----------------------------------------+----------------+------------+---------------------+-----------------+-----------------+
| r2plus1d_v1_resnet18_kinetics400       | 40.645         | 31.505     | 804.31              | 0.0398          | 71.72           |
+----------------------------------------+----------------+------------+---------------------+-----------------+-----------------+
| r2plus1d_v1_resnet34_kinetics400       | 75.400         | 61.832     | 503.17              | 0.0636          | 72.63           |
+----------------------------------------+----------------+------------+---------------------+-----------------+-----------------+
| r2plus1d_v1_resnet50_kinetics400       | 65.543         | 53.950     | 667.06              | 0.0480          | 74.92           |
+----------------------------------------+----------------+------------+---------------------+-----------------+-----------------+
| r2plus1d_v2_resnet152_kinetics400      | 252.900        | 118.227    | 546.19              | 0.1172          | 81.34           |
+----------------------------------------+----------------+------------+---------------------+-----------------+-----------------+
| ircsn_v2_resnet152_f32s2_kinetics400   | 74.758         | 29.704     | 435.77              | 0.1469          | 83.18           |
+----------------------------------------+----------------+------------+---------------------+-----------------+-----------------+
| slowfast_4x16_resnet50_kinetics400     | 27.820         | 34.480     | 1396.45             | 0.0458          | 75.25           |
+----------------------------------------+----------------+------------+---------------------+-----------------+-----------------+
| slowfast_8x8_resnet50_kinetics400      | 50.583         | 34.566     | 1297.24             | 0.0493          | 76.66           |
+----------------------------------------+----------------+------------+---------------------+-----------------+-----------------+
| slowfast_8x8_resnet101_kinetics400     | 96.794         | 62.827     | 889.62              | 0.0719          | 76.95           |
+----------------------------------------+----------------+------------+---------------------+-----------------+-----------------+
| tpn_resnet50_f8s8_kinetics400          | 50.457         | 71.800     | 1350.39             | 0.0474          | 77.04           |
+----------------------------------------+----------------+------------+---------------------+-----------------+-----------------+
| tpn_resnet50_f16s4_kinetics400         | 99.929         | 71.800     | 1128.39             | 0.0567          | 77.33           |
+----------------------------------------+----------------+------------+---------------------+-----------------+-----------------+
| tpn_resnet50_f32s2_kinetics400         | 198.874        | 71.800     | 716.89              | 0.0893          | 78.90           |
+----------------------------------------+----------------+------------+---------------------+-----------------+-----------------+
| tpn_resnet101_f8s8_kinetics400         | 94.366         | 99.705     | 942.61              | 0.0679          | 78.10           |
+----------------------------------------+----------------+------------+---------------------+-----------------+-----------------+
| tpn_resnet101_f16s4_kinetics400        | 187.594        | 99.705     | 754.00              | 0.0849          | 79.39           |
+----------------------------------------+----------------+------------+---------------------+-----------------+-----------------+
| tpn_resnet101_f32s2_kinetics400        | 374.048        | 99.705     | 479.77              | 0.1334          | 79.70           |
+----------------------------------------+----------------+------------+---------------------+-----------------+-----------------+


.. note::

    Feel free to skip the tutorial because the speed computation scripts are self-complete and ready to launch.

    :download:`Download Full Python Script: get_flops.py<../../../scripts/action-recognition/get_flops.py>`

    :download:`Download Full Python Script: get_fps.py<../../../scripts/action-recognition/get_fps.py>`

    You can reproduce the numbers in the above table by

    ``python get_flops.py --config-file CONFIG`` and ``python get_fps.py --config-file CONFIG``

    If you encouter missing dependecy issue of ``thop``, please install the package first.

    ``pip install thop``

"""


=====

 get_flops.py

=====

"""
Script to compute FLOPs of a model
"""
import os
import argparse

import torch
from gluoncv.torch.model_zoo import get_model
from gluoncv.torch.engine.config import get_cfg_defaults

from thop import profile, clever_format


if __name__ == '__main__':
    parser = argparse.ArgumentParser(description='Compute FLOPs of a model.')
    parser.add_argument('--config-file', type=str, help='path to config file.')
    parser.add_argument('--num-frames', type=int, default=32, help='temporal clip length.')
    parser.add_argument('--input-size', type=int, default=224,
                        help='size of the input image size. default is 224')

    args = parser.parse_args()
    cfg = get_cfg_defaults()
    cfg.merge_from_file(args.config_file)

    model = get_model(cfg)
    input_tensor = torch.autograd.Variable(torch.rand(1, 3, args.num_frames, args.input_size, args.input_size))

    macs, params = profile(model, inputs=(input_tensor,))
    macs, params = clever_format([macs, params], "%.3f")
    print("FLOPs: ", macs, "; #params: ", params)


=====

 get_fps.py

=====

"""
Script to compute latency and fps of a model
"""
import os
import argparse
import time

import torch
from gluoncv.torch.model_zoo import get_model
from gluoncv.torch.engine.config import get_cfg_defaults


if __name__ == '__main__':
    parser = argparse.ArgumentParser(description='Compute FLOPs of a model.')
    parser.add_argument('--config-file', type=str, help='path to config file.')
    parser.add_argument('--num-frames', type=int, default=32, help='temporal clip length.')
    parser.add_argument('--input-size', type=int, default=224,
                        help='size of the input image size. default is 224')
    parser.add_argument('--num-runs', type=int, default=105,
                        help='number of runs to compute average forward timing. default is 105')
    parser.add_argument('--num-warmup-runs', type=int, default=5,
                        help='number of warmup runs to avoid initial slow speed. default is 5')

    args = parser.parse_args()
    cfg = get_cfg_defaults()
    cfg.merge_from_file(args.config_file)

    model = get_model(cfg)
    model.eval()
    model.cuda()
    input_tensor = torch.autograd.Variable(torch.rand(1, 3, args.num_frames, args.input_size, args.input_size)).cuda()
    print('Model is loaded, start forwarding.')

    with torch.no_grad():
        for i in range(args.num_runs):
            if i == args.num_warmup_runs:
                start_time = time.time()
            pred = model(input_tensor)

    end_time = time.time()
    total_forward = end_time - start_time
    print('Total forward time is %4.2f seconds' % total_forward)

    actual_num_runs = args.num_runs - args.num_warmup_runs
    latency = total_forward / actual_num_runs
    fps = (cfg.CONFIG.DATA.CLIP_LEN * cfg.CONFIG.DATA.FRAME_RATE) * actual_num_runs / total_forward

    print("FPS: ", fps, "; Latency: ", latency)


=====

reference: https://cv.gluon.ai/build/examples_torch_action_recognition/speed.html

=====